- 2017-07-13: Updated for version 1.3 of my container image which includes some updated dashboards
- 2017-05-21: Updated for version 1.2 of my container image which includes NetApp SDK 5.7
- 2016-11-15: Updated for version 1.1 of my container image which includes Grafana 3.1 and NetApp Harvest 1.3
- 2018-03-18: Updated for version 1.4.1 of my container image which includes bug fixes, Grafana 4.5.2 and NetApp Harvest 1.4
- 2020-01-18: Updated for version 1.6 of my container image which includes NetApp Harvest 1.6 (and is now hosted at hub.docker.com)
This post is based on the original “How To Setup NetApp Harvest Using Docker” blog post however it has been tweaked to reflect the more simplistic deployment method which relies on a pre-built container image (vs building one from source).
Setup a Docker host server (physical or virtual) with at least the following recommended specs:
- CPU: 1 CPU
- RAM: 4GB
- HDD: / - 20GB, /opt/data - 100GB
- NOTE: The 100GB disk can of course be thin provisioned.
- Network: Outbound ftp/http/https access to download the appropriate files/packages needed to construct the Harvest Docker container.
- Linux Distribution: CentOS or Red Hat Enterprise Linux (RHEL) 6.7+ or 7.0+ are preferred otherwise see the link under the “Other Distributions” section below for more details.
- Access: Root (direct or via sudo)
- For secure environments where the default umask value is adjusted, verify that the settings do not apply to system services (daemons) by checking the “/etc/init.d/functions” file (CentOS/RHEL 6). If the umask value in the aforementioned file is adjusted, please temporarily set it to 022. Once all the deployments steps discussed in this post are completed, you can then safely revert the umask setting back to its original (secure) value.
Setup the 100GB disk and mount its filesystem to /opt/data
fdisk /dev/sdb
n
p
1
<Enter>
<Enter>
t
8e
w
pvcreate /dev/sdb1
vgcreate VolGroup01 /dev/sdb1
lvcreate -n data VolGroup01 -l 100%FREE
mkfs.ext4 /dev/VolGroup01/data
mkdir -v /opt/data
echo "/dev/mapper/VolGroup01-data /opt/data ext4 defaults 1 2" >> /etc/fstab
mount -v /opt/data
Create the appropriate directories which will house the docker container build files
mkdir -pv /root/docker/harvestCreate the appropriate directories on the host which will store persistent container data (such as the Harvest configuration, Graphite database files, etc)
mkdir -pv /opt/data/opt/netapp-harvest-conf /opt/data/var/lib/carbon/{rrd,whisper}
chown 999:997 -Rv /opt/data/var/lib/carbon/
chmod 755 -Rv /opt/data
Install and start docker
CentOS/RHEL 6.7+
yum install https://dl.fedoraproject.org/pub/epel/6/x86_64/epel-release-6-8.noarch.rpm -y
yum install docker-io -y
chkconfig docker on
/etc/init.d/docker start
CentOS 7.0+
yum install docker -y
systemctl enable docker
systemctl start docker
RHEL 7.0+
curl -sSL https://get.docker.com/ | sh
systemctl enable docker
systemctl start docker
Other Distributions
- See here
Deploy the NetApp Harvest docker image
docker run --name harvest -d --privileged=false --cap-add=SYS_ADMIN --tmpfs /run --tmpfs /run/lock --tmpfs /tmp -v /opt/data/opt/netapp-harvest-conf:/opt/netapp-harvest-conf:Z -v /opt/data/var/lib/carbon:/var/lib/carbon:Z -p 80:80 -p 8080:8080 --restart=always dburkland/harvest:latest
NOTE: Since we specified the "--restart=always" flag, the Harvest container will start/stop automatically with the host system.
Create the Harvest role on each NetApp system you wish to monitor
7mode
useradmin role add role-harvest -c "Role for performance monitoring by NetApp Harvest" -a login-http-admin,api-system-get-version,api-system-get-info,api-perf-object-*,api-ems-autosupport-log
useradmin group add group-harvest -c "Group for performance monitoring by NetApp Harvest" -r role-harvest
cDOT
security login role create -role role-harvest -access readonly -cmddirname "version"
security login role create -role role-harvest -access readonly -cmddirname "cluster identity show"
security login role create -role role-harvest -access readonly -cmddirname "cluster show"
security login role create -role role-harvest -access readonly -cmddirname "system node show"
security login role create -role role-harvest -access readonly -cmddirname "statistics"
security login role create -role role-harvest -access readonly -cmddirname "lun show"
security login role create -role role-harvest -access readonly -cmddirname "network interface show"
security login role create -role role-harvest -access readonly -cmddirname "network interface show"
security login role create -role role-harvest -access readonly -cmddirname "qos workload show"
Create the Harvest user on each NetApp system you wish to monitor
7mode
useradmin user add harvest -c "User account for performance monitoring by NetApp Harvest" -n "NetApp Harvest" -g group-harvestcDOT 8.2 or earlier
security login create -username harvest -application ontapi -role role-harvest -authmethod passwordcDOT 8.3 or greater
security login create -user-or-group-name harvest -application ontapi -role role-harvest -authmethod passwordActiveIQ Unified Manager or OCUM (Required for capacity data)
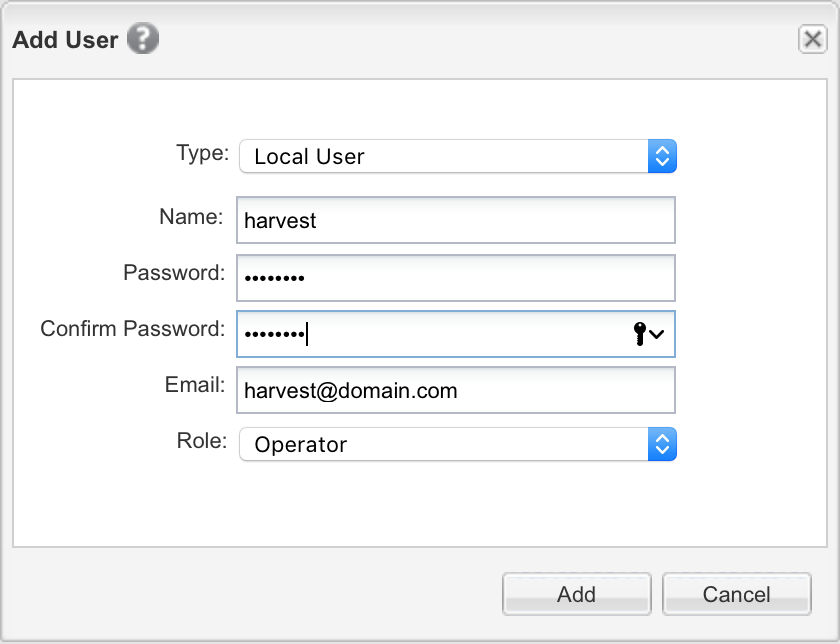
- Login to the web interface as the “admin” user
- Navigate to “Administration” -> “Manage Users”
- Click “Add” to bring up the “Add User” window and create the “harvest” user as seen in the screenshot
For certificate authentication see the “NetApp Harvest Installation and Administration Guide” located here for more information
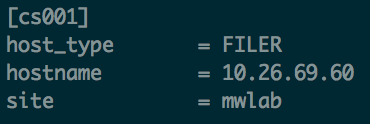
Add all applicable NetApp 7mode or cDOT systems to “/opt/data/opt/netapp-harvest-conf/netapp-harvest.conf” on the Docker host (See examples below). Also, do not forget to change “username” to reflect the local user account you created on the NetApp system(s) in the previous step.
7mode controller or cDOT cluster
ActiveIQ Unified Manager or OCUM server (Required for capacity dashboards)

Login to the container and restart the Harvest service to apply the changes
docker exec -t -i harvest /bin/bash
/etc/init.d/netapp-harvest restart
You should now be able to login to Grafana by pointing your web browser at http:// DockerHostIP
- Default Username: admin
- Default Password: admin
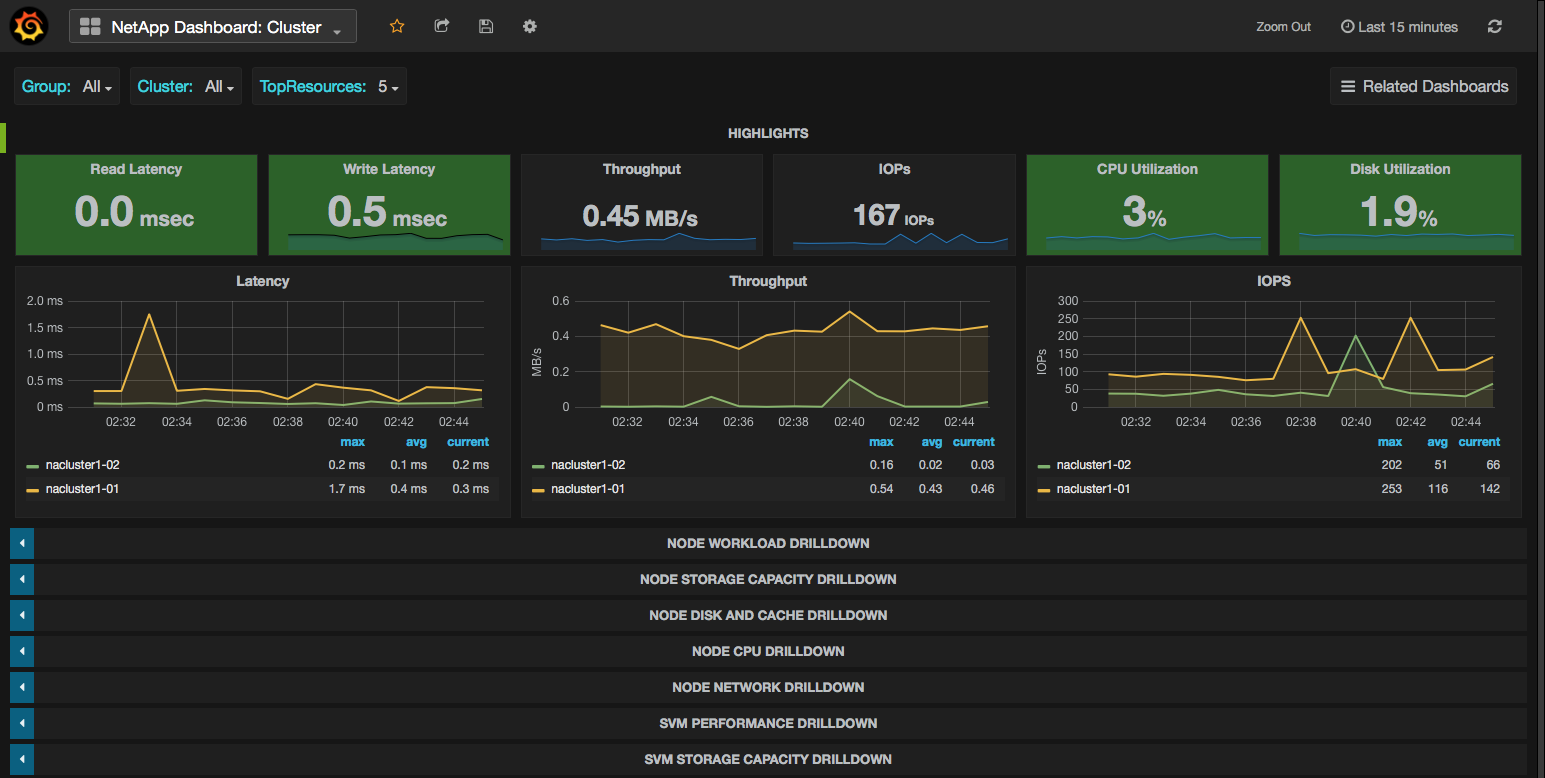
Within a half hour the dashboards should be correctly displaying realtime statistics as seen in the following example screenshot:
Troubleshooting
- Basic commands for managing the Harvest docker container
Manually stop the container
# docker kill harvestManually start the container
# docker start harvestLogin to the container
# docker exec -t -i harvest /bin/bash
- Basic commands for managing the Harvest docker container
Sources
- [GitHub] dburkland/harvest Repository
- [GitHub] Tech ONTAP Live: NetApp Performance Tools Update Slide Deck
- NetApp Harvest Installation and Administration Guide
- Christopher Madden’s Blog
- 2258-3: Real-time Monitoring of Clustered Data ONTAP
- [DBurkland.com] How To Setup Graphite To Visualize OnCommand Performance Manager Data
- [DBurkland.com] How To Setup Grafana with Graphite And Create Basic Dashboards
- What is Docker?
- Docker Volumes Using NetApp Storage